
A research organization’s experiment records are the foundation of its intellectual property, and, as such, must be stored in a way that allows the research organization to maintain control over these records. Enterprise electronic notebooks, such as our iExperiment, store their experiment records on a server. Many organizations, including Colabrativ, Inc., are using cloud computing to lower the cost of a server and IT costs in general. Amazon’s Elastic Compute Cloud (EC2) is one of the lower cost cloud service providers. Amazon is Statement on Auditing Standards No. 7 (SAS70) compliant. They completed the Type II audit in 2009, so you know they are doing everything they can to keep our data secure. Amazon Web Services places the responsibility of the enterprise application setup and maintenance on the client’s administrator. Other full-service SAS70-complaint cloud service providers will happily take on these responsibilities for you, for a fee.
In this post and in the following post, I will show you how we setup our enterprise electronic notebook application, iExperiment, on an Amazon EC2 server. This first post covers the launch of the Amazon EC2 server and attachment of Elastic Block Storage volume to the server. The cloud equivalent of purchasing a server and disk, plugging it in, and connecting it to the network. Experienced Amazon EC2 administrators may want to take a quick look at iExperiment Server Requirements and then move on to the second post on the setup and configuring of an EC2 server for iExperiment.
- iExperiment Server Requirements
- Setup of Amazon Web Services EC2 Instance
- Creating and Attaching an Elastic Block Storage Volume (optional)
- Assigning URL of the iExperiment EC2 Server on the DNS Server
In the second post we will go over the setup and configuration of the EC2 server and the installation and setup of iExperiment on it. Topic in the post include:
- Updating the Server
- Installing MySQL
- iExperiment Database Setup
- Mounting Elastic Block Storage Volume (optional)
- SSL Certificate Creation
- Setup Apache & Tomcat
- Adding index.html
- iExperiment Applications Installation
iExperiment Server Requirements
The requirements of our enterprise electronic notebook application, iExperiment, are:
- Linux hosting web environment: We normally use Apache and Tomcat.
- MySQL database.
- Mail server: By default iExperiment uses the iExperiment.net mail server.
In addition to these requirements, we recommend that you have the following before setting up iExperiment.
- A subdomain name under your domain name for iExperiment, for example iexperiment.example.org.
- An administrator mail address on your mail server, e.g. admin@example.org.
Setup of Amazon Web Services EC2 Instance
If you are not familiar with Amazon Web Services, we recommend that you read the Amazon Elastic Compute Cloud Getting Started Guide. There you can find instructions on how to sign up for Amazon EC2, which tell you to “Go to http://aws.amazon.com/ec2, click on the Sign Up for Amazon EC2, and follow the on-screen instructions.”
After signing on in the Amazon Management Console, and selecting a region, the following tasks are performed.
-
Select an Amazon Region for the iExperiment Server
Select a Region from the region pull-down menu at the top of the Navigation panel. We are in Northern California, so we normally select the US West (N. California) region.
-
Create Security Group
Open the Security Groups panel by clicking on its link under NETWORK & SECURITY in the Navigation panel.
- Click on the “Create Security Group” button at the top of the Security Group panel.
This will bring up the “Create Security Group” popup. - In the “Create Security Group” popup, fill in the following information:
Name: iExperiment Description: iExperiment open ports: 22 (SSH), 80 and 8080 (HTTP), and 443 and 8443 (HTTPS) VPC: No VPC Then click on the “Yes, Create” button.
- Click on the iExperiment security group, and click on the “Inbound” tab.
- In the “Inbound” tab add the following rules:
- From the “Create a new rule” pull-down menu, select “SSH”,
then click on the “Add Rule” button. - From the “Create a new rule” pull-down menu, select “HTTP”,
then click on the “Add Rule” button. - From the “Create a new rule” pull-down menu, select “HTTPS”,
then click on the “Add Rule” button. - From the “Create a new rule” pull-down menu, select “Custom TCP rule”,
enter the “port range” of 8080,
then click on the “Add Rule” button. - From the “Create a new rule” pull-down menu, select “Custom TCP rule”,
enter the “port range” of 8443,
then click on the “Add Rule” button.
The resulting security table contains the following rules:
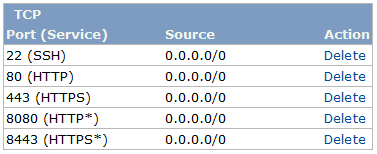
- After adding all of the Rules, click on the “Apply Rule Changes” button at the bottom of the Inbound* tab.
- From the “Create a new rule” pull-down menu, select “SSH”,
- Click on the “Create Security Group” button at the top of the Security Group panel.
-
Create Key Pair
Open the Key Pairs panel by click on its link under NETWORK & SECURITY in the Navigation panel.
- Click on the “Create Key Pair” button at the top of the Key Pairs panel.
This will bring up the “Create Key Pair” popup. - Supply a “Key Pair Name”, then click on the “Create” button.
Amazon will create the key pair and download the file to you.
Save the .pem file somewhere accessible to you.
- Click on the “Create Key Pair” button at the top of the Key Pairs panel.
-
Launch EC2 Instance
Open the Instances panel by clicking on its link under INSTANCES in the Navigation panel.
- Click on the “Launch Instance” button at the top of the My Instances panel.
This will bring up the “Request Instances Wizard” popup. - Click the “Select” button to the right of the “Basic 32-bit Amazon Linux AMI 2011.02.1 Beta” under the “Quick Start” tab in the Request Instances Wizard.
- Fill in the Instance Details:
Instance Details Number of Instances: 1 Availability Zone: us-west-1a Instance Type: Small (m1.small, 1.7 GB) Then click on the “Continue” button at the bottom of the popup.
- We normally change nothing in the “Advanced Instance Options“.
Click on the “Continue” button at the bottom of the popup. - If you have multiple EC2 instances, you may want to add Tags to the iExperiment instance.
Click on the “Continue” button at the bottom of the popup. - Choose the “Choose from your existing Key Pairs” option, then select the key pair for iExperiment from a “Your existing Key Pair” pull-down menu.
Click on the “Continue” button at the bottom of the popup. - Choose the iExperiment security group using the “Choose one or more of your existing Security Groups” option from list of security groups, then
click on the “Continue” button at the bottom of the popup. - Review the configuration of your EC2 Instance request, then
click on the “Launch” button at the bottom of the “Request Instances Wizard” popup.
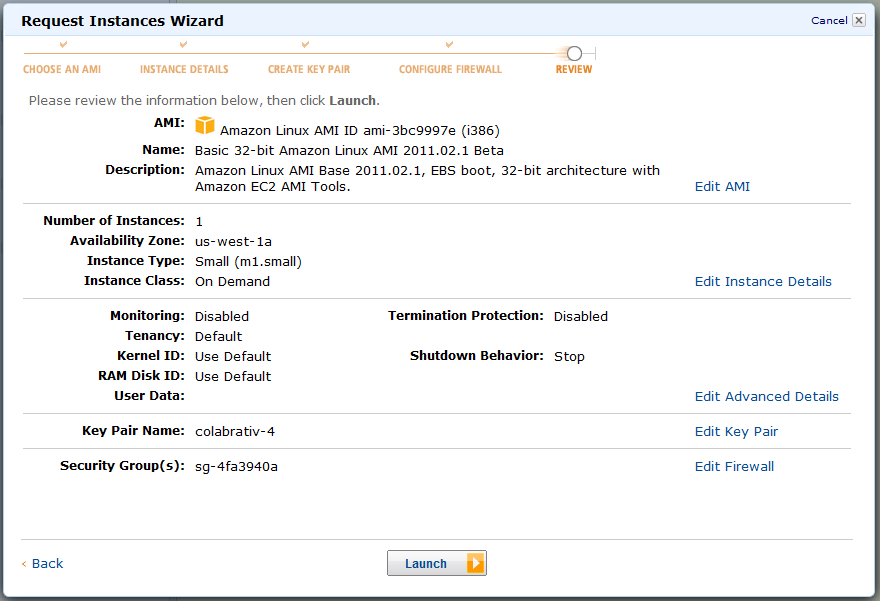
It’s worth noting the id, Availability Zone, and Public DNS of the EC2 instance you created by clicking on the instance in the “My Instances” panel.
- Click on the “Launch Instance” button at the top of the My Instances panel.
-
Create an Elastic IP
Amazon’s Elastic IP Addresses are static IP addresses that you can associate with an Amazon EC2 server. Open the Addresses panel by clicking on the Elastic IPs link under NETWORK & SECURITY in the Navigation panel.
- Click on the “Allocate New Address” button at the top of the “Addresses” panel.
This will bring up the “Allocate New Address” popup.
Click on the “Yes, Allocate” button in the popup.
This will create a new address. - Click on the new Elastic IP address and select Associate Address.
This will bring up the “Associate Address” popup.
Select the iExperiment EC2 Instance from the “Instance” pull-down list and
click on the “Yes, Associate” button in the popup.
The eleastic IP address will be needed when setting up the Domain Name Server, below, so make a note of it.
- Click on the “Allocate New Address” button at the top of the “Addresses” panel.
Creating and Attaching an Elastic Block Storage Volume (optional)
We highly recommend that you place your experiment records created in iExperiment on an EC2 server in an Elastic Block Storage (EBS) volume. EBS isolates your data from the server failures and its scalable. An existing volume can be copied to a large volume as your iExperiment records increase. From the Amazon Management Console open the EBS Volumes panel by clicking on the Volumes link under ELASTIC BLOCK STORE in the Navigation panel.
- Click on the “Create Volume” button at the top of the “EBS Volumes” panel.
This will bring up the “Create Volume” popup. - In the “Create Volume” popup enter a volume Size, and Availability Zone.
The volume Size you choose will primarily depend on the size of the figures and attachment the researchers using iExperiment plan to associate with their experiment records. 10 GiB is a good starting size. The Availability Zone must be the same as the iExperiment instance.
Click on “Yes, Create” button in the popup. - Click on the EBS volume you just created and select “Attach Volume”.
This will bring up the “Attach Volume” popup with Volume already filled in.
Select the iExperiment EC2 instance, shown by id, from the Instances pull-down menu.
Click on the “Yes, Attach” button in the popup to attach the EBS volume to the iExperiment instance.
Assigning URL of the iExperiment EC2 Server on the DNS Server
Here we will use the domain name temp.iExperiment.net, but you will be using a sub-domain of your domain such as iexperiment.example.com. We are using Kattare Internet Services for our DNS server. There we associate the AWS Elastic IP address with both the sub-domain and its secure variant in the iExperiment Zone File:
| temp | IN | A | 50.18.109.21 |
| www.temp | IN | A | 50.18.109.21 |
| securetemp | IN | A | 50.18.109.21 |
| www.securetemp | IN | A | 50.18.109.21 |
Terrific work! This is the kind of info that are supposed to be shared across the internet. Disgrace on Google for now not positioning this put up upper! Come on over and visit my website . Thank you =)